Win32 Priority Separation in Windows 10 – Make Your PC Fast
Almost everyone deals with the problem of memory underflow. Here, in this article we will explain to you exactly what Win32 Priority Separation is and the right way to use it.
Contents
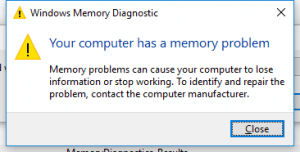
Memory Issue
Every system has some background processes that keep on running behind the back of the user. Sometimes, these processes are crucial and should not be terminated. On the other hand, many services are not important and only eat up the memory resource of one’s computer. The Adobe GC Invoker Utility is one of such services. To fix this, read this complete guide on the GC Invoker Utility.
This issue not only eats up your memory but also results in a degradation in the performance and behavior of one’s system.
The memory problem can be solved by rebooting one’s computer but it can only be used once in a while. Rebooting your system every time you face the problem can become a hard job.
To ensure the proper memory management and work1ing of your system, Windows offers one service known as Win32 Priority Separation, which assigns priority values to different programs and tasks running in the background. We have discussed Win32 Priority Separation in great detail below.
Win32 Priority Separation
Win32 Priority separation is an inbuilt feature that is provided in the latest versions of Microsoft Windows. This feature allows the user to limit the processor usage time for each process. The user can restrict the time for the foreground as well as background processes.
The main concept of this feature is that it allocates a priority value for all the running services and assigns maximum memory to the task labeled with high priority. The background tasks which do not need much memory for their execution are labeled as “Low” in priority.
Microsoft Windows has set some default value for all the programs and services running on the machine, but a user can also tweak the settings to make them as per his/her wish and will.
In this article, we will show exactly how you can change and alter Win32 Priority separation to increase system performance and decrease memory usage.
How To Use Win32 Priority Separation To Allocate More Memory To A Particular Task
Here, in this section, we will be discussing the steps and procedures to tweak the Windows memory allocation service and allocate more memory to the programs that need it.
Two different methods can be used to allocate more memory to certain programs and tasks. We will be discussing both of them in the below section
1. Using ”Regedit”
We all know that the REGEDIT is the inbuilt Registry Editor that a user can use to add, update, alter, or delete registry keys. A faulty change in a system’s keys can lead to undefined behavior and mishaps. So, be sure to check out the below-given steps carefully before trying to implement them.
- Click on the “Start” button that is located on the bottom left of your taskbar.
- Search for the term “regedit” and open the application that is on the top. (regedit Run command)
- Registry Editor dialog box will pop up in front of your eyes.
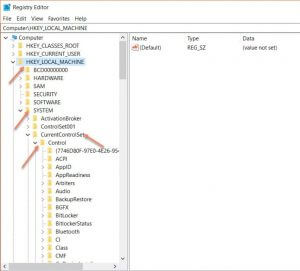
- Find ‘HKEY_LOCAL_MACHINE’ and click on that.
- Go to “System” and then “CurrentControlSet“.
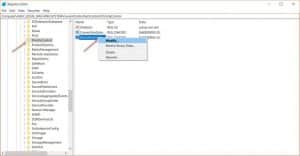
- Select “Control” and find the “Priority Control” option.
- Right Click on Win32 Priority Separation and select “Modify“.
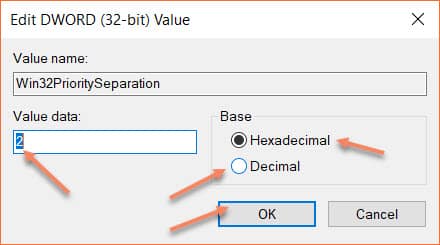
- You will be presented with an Edit DWord dialog box.
- You have to tweak some of these settings as given below.
- If you select Hexadecimal, then change the value data to 26.
- If you select Decimal, then change the value data to 38.
- Now click on OK and close the dialog box.
Make sure to close all the programs and reboot your system to experience the changes.
2. Using Run Dialog Box
This is the second method that you can use to improve your system’s performance using Win32 Priority Separation.
- Click on the “Start” button that is located on the bottom left of your taskbar.
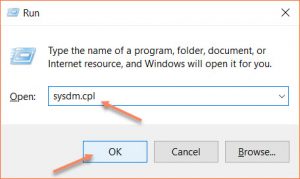
- Type “Run” and open the application that is on the top.
- Type “sysdm.cpl” in the Run command space and press Enter.
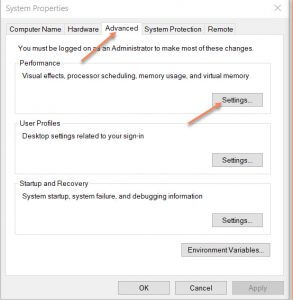
- You will be presented with a System Properties Tab on your screen.
- Go to Advanced > Setting in the dialog box.
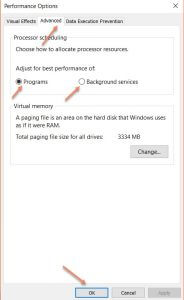
- A performance Dialog box will pop up in front of you.
- Again select Advanced.
- You will be offered two choices to opt from. One will be the Best performance for foreground applications and others for background applications. You can opt for any one depending on your use of the system.
- When you are done, click on the Done/OK option to close the window.
- Reboot your PC and see the change.
Conclusion
So, this was our post on allocating more space and memory to programs using the Win32 Priority Allocation feature provided in Windows. Feel free to comment regarding any problem with Win32 Priority Separation.

